
First let me talk about how I got the assignment. It was my first trip to IlluXCon in 2009 and my first time anywhere showcasing my work. When Pat Wilshire invited me to the event I have to admit I had many reservations, mainly because I thought I wasn't ready. I would have to travel across country, ship all of my work and supplies out, set up a booth, show my work with lots of amazing artists some of whom I've been admiring since I was a kid. I swallowed my fears and agreed to do the show. It was the best thing I could have done for my career to this date.
Pat set my booth up right in the thick of it. I had Brom to my right, Don Maitz to my left, and Dan Dos Santos and Larry Elmore right across from me. The pond I was swimming in suddenly felt a lot bigger. As I was getting set up, I was already getting positive responses on my work. This helped put my nerves at ease. To make a long story short: I made lots of new friends, sold some work, and made some very valuable contacts, including Lou Andres who commissioned me to do The Goblin Corps cover. I guess my point is, make yourself accessible and self-promote professionally. Networking is one of the best ways to get noticed.
Step 1- Thumbnails
My first step after receiving and reading the manuscript is to do thumbnails. I want to get out as many ideas as possible so, I fill sketchbook pages with little composition ideas. All the while I'm thinking about the book cover template I will have to stick within. For example- 1/4" bleed around the image, title of the book, authors name, etc. I try to stay in the thumbnail phase as long as possible. The longer I'm in this phase the more interesting(not always good)the sketches get. It forces me to try the unconventional. Now I may end up going with one of my first few sketches in the end, but I still like to see my options. No one sees these except me.

Step 2-Rough Comps/Sketches
After I narrow down a few that I like, I'll do little qouache comps or rough sketches to show my art director my thoughts. I keep these crude and simple, no need to spend a lot of time making these pretty, these are just to get basic ideas out. Once the AD has had time to look them over we discuss what we like and don't like. I then get a better idea of what the AD likes and either continue the sketches or move onto the next phase depending if the AD likes one in particular.

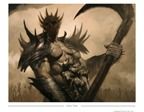
Step 3- Detailed Sketch
Once the AD is happy with the compositon I do a sketch showing a bit more detail and my ideas for the smaller designs. I will now reference books, images on the internet, other artist's work, and movies for as much reference and inspiration as possible. In this phase is where the AD will get to make changes to the overall designs like porportions, specific costume or environment details, etc.

Step 4-Shooting Ref
In this part of the illustration process, I either borrow or buy costumes and props, and either hire a model or use friends to get my reference. Most of the time I use myself or my wife, it's the cheapest and most accessible way to go. I try and shoot all of my photos from one vantage point that's as close to my horizon line in my sketch as possible. Sometimes a reference shot I shoot works better than what's in a sketch, use it! If you hire a good model, let them give you ideas, sometimes it's for the best. You also have to be a good director, knowing when and how to push your models.

Step 5- Final Drawing
After filtering and printing out all of my reference, I do one last drawing. I usually blow up my rough sketch and drop the opacity on it so you can barely see it. I then print out the rough onto archival bristol paper and do a final drawing. I do this because it saves time, and I can help carry over that "fresh" feeling the initial sketch had. Using my reference photos I can now put that extra layer of reality into the drawing. I figure out all of the nuts and bolts, the last details and designs.

Step 6- The Painting
I then use a projector to transfer the sketch onto a surface. Most of the time I paint on heat tempered gessoed Masonite. I don't have any pics of the process of my painting, but I'll briefly describe my main process. I usually wash in my colors and values with a thinned layer of oils. I'm mainly looking for the overall mood of the piece. If I can capture this early on, I have a better idea of what the final will look like. Once the white of the surface is covered I pick an area and start to render. I usually start in a focal area and bring this close to finish, this will help dictate the finished look for the rest of the painting. From here on out, it just takes time. I render bit by bit and I'm constantly taking breaks to get away from the painting. It's important to look at it through "fresh eyes". It's very easy to get tunnel vision which can keep you from looking at the painting as a whole. After I'm finished I send it over to the AD for approval. If there are revisions, I'll usually do them in Photoshop to save time. Once approved I send the client a high res image which I shoot of the painting myself. Invoice and wait for payment. While you wait, go pick up The Goblin Corps and read it. =)


I just found your work a few days ago and I'm really loving it. Thanks so much for sharing this process piece as well. I'm in the early stages of learning to paint and insight into another artist's process and approach is incredibly valuable to me.
ReplyDeleteThanks again!
Fantastic! Thanks for sharing your process Lucas!
ReplyDeleteI appreciate your comments about feeling like you aren't ready, but swallowing your fears and getting out there. I don't feel that my work is good enough to compete with the big names, and that stops me from going to any of the classes or workshops, let alone something like Illuxcon. Look forward to the day when I can get past that!
ReplyDeleteLucas, I've revisited this post several times, and it never ceases to keep me humbled and eager to plan more before creating an illustration.
ReplyDeleteI hope I get to pick up more prints of yours and chat with you in person at IlluXCon 2012!
Hey Jonathan- I'm glad this post helps. See you in Nov!
ReplyDeleteThank you for this very useful post!
ReplyDelete